Getting Started with Stuga: A Better Home Assistant Dashboard
Learn how to set up Stuga, the mobile-first Home Assistant dashboard that requires zero YAML configuration. Connect your smart home in minutes.
If you've spent hours configuring YAML files for your Home Assistant dashboard, you're not alone. The default Lovelace interface is powerful but comes with a steep learning curve. Stuga offers a different approach: a ready-to-use mobile dashboard that reads your existing Home Assistant setup and just works.
In this guide, you'll learn how to set up Stuga on your phone and start controlling your smart home in under five minutes.
What You'll Need
Before getting started, make sure you have:
- Home Assistant 2023.1 or newer running on your network
- An Android or iOS device (or a browser with HTTPS access to your HA instance)
- Your devices organized into areas in Home Assistant (optional, but recommended)
Stuga works with any Home Assistant installation, including:
- Home Assistant OS on Raspberry Pi
- Home Assistant Container (Docker)
- Home Assistant Supervised
- Home Assistant Core
Step 1: Install the App
Download Stuga from your device's app store:
- Android: Get it on Google Play
- iOS: Download on the App Store
- Web: Visit stuga.app/run (requires HTTPS access to your Home Assistant)
The native apps work with local Home Assistant installations that aren't exposed to the internet. If you only have local HTTP access (no SSL certificate), the mobile apps are your best option.
Step 2: Connect to Home Assistant
When you first open Stuga, you'll see a setup screen asking for your Home Assistant URL.
- Enter your Home Assistant address (e.g.,
http://homeassistant.local:8123) - Stuga will detect available connection options and suggest alternatives if needed
- Choose your preferred authentication method:
- OAuth (recommended): Log in through Home Assistant's built-in login page
- Long-lived access token: Paste a token from your HA profile (useful for advanced setups)
- Authorize Stuga to access your Home Assistant
Tip: Finding your Home Assistant URL
Not sure what URL to use? Try http://homeassistant.local:8123 or check your router for the IP address of your Home Assistant device. Stuga will help suggest alternatives if your initial URL doesn't work.
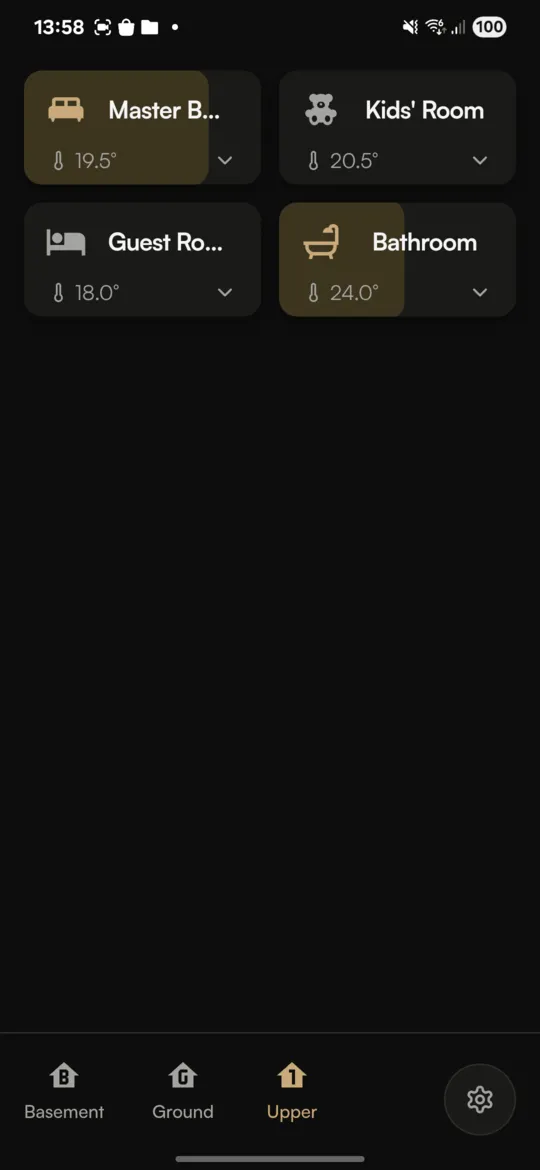
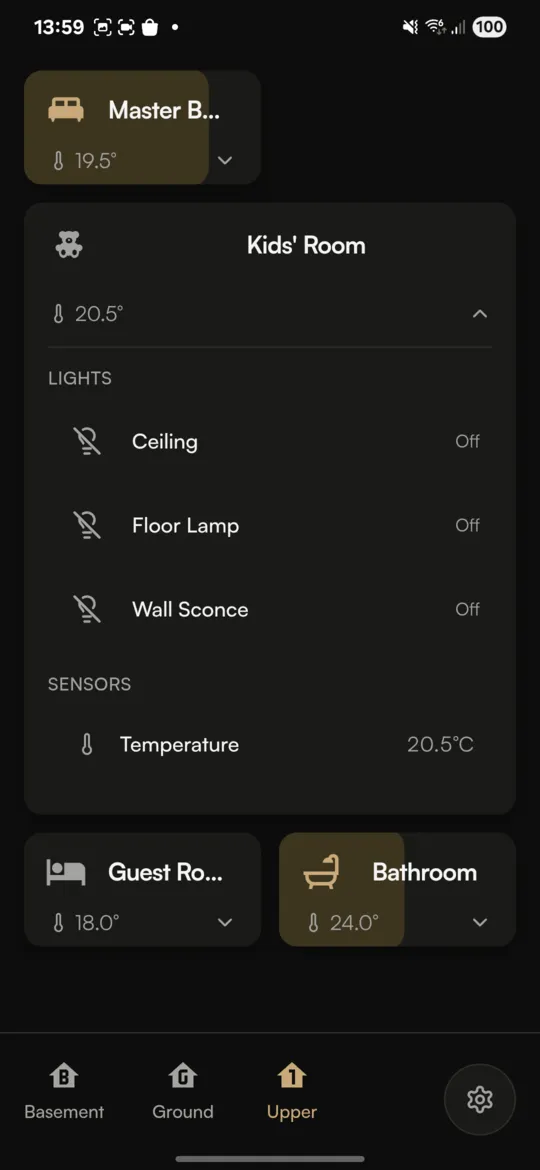
Step 3: Explore Your Rooms
Once connected, Stuga automatically displays your Home Assistant areas as room cards. Each card shows:
- Room name and icon
- Number of lights on (if any)
- Current temperature (if sensors are assigned to the area)
- Humidity (if available)
Tap any room card to expand it and see all devices in that area. Tap a device to toggle it, or long-press for more controls like brightness sliders for lights.
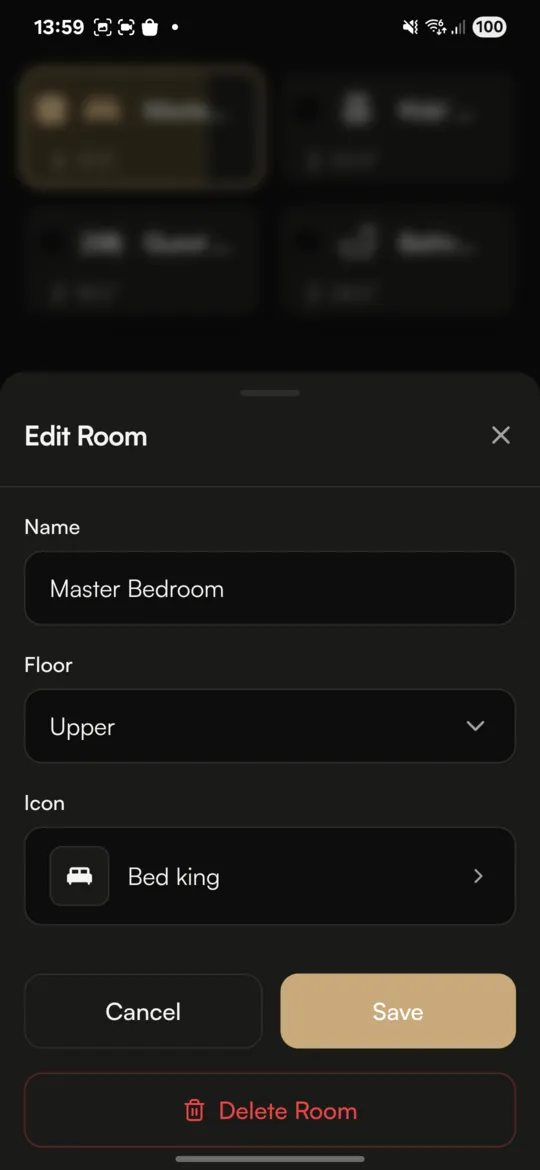
Step 4: Customize Your Dashboard
Stuga lets you personalize your dashboard without touching any configuration files:
Edit Room Names and Icons
Long-press any room card and tap the edit icon. You can change the room's display name and icon. These changes are saved directly to Home Assistant, so they'll appear in your other dashboards too.
Reorder Rooms
Want your most-used rooms at the top? Open Settings (tap the gear icon) and select "Reorder rooms." Drag and drop rooms to arrange them how you like. You can even drag rooms between floors.
Hide Devices
Have devices you don't want to see in Stuga? Long-press a device and choose to hide it. You can hide devices just in Stuga (they'll still appear in Home Assistant) or hide them everywhere.
Step 5: Use Multi-Room Control
One of Stuga's most useful features is multi-room selection. To control multiple rooms at once:
- Long-press a room card to enter selection mode
- Tap additional rooms to select them
- Use the control bar at the bottom to turn all lights on/off or adjust brightness
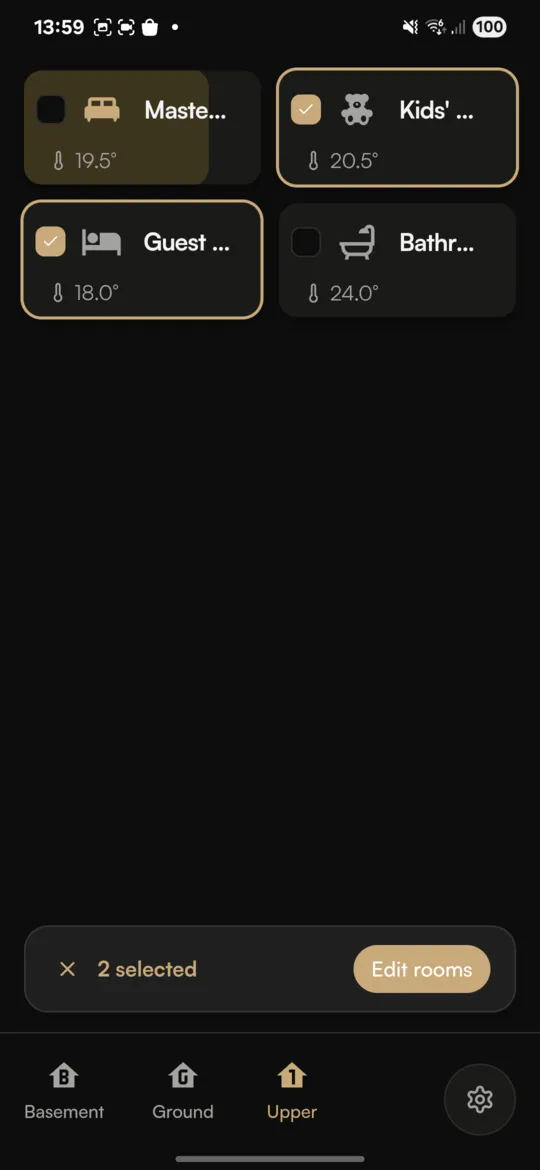
This is perfect for scenarios like turning off all lights when leaving home or dimming lights across your living spaces for movie night.
Working with Floors
If you've organized your Home Assistant areas into floors, Stuga displays them as swipeable tabs. Swipe left or right to navigate between floors, or tap the floor tabs at the top.
You can also create and edit floors directly in Stuga:
- Tap the floor tabs to enter floor edit mode
- Tap "Create floor" to add a new floor
- Drag rooms between floors by holding over a floor tab
Privacy and Data
Stuga is designed with privacy in mind:
- No accounts required: Your credentials stay on your device
- No cloud sync: All communication is directly with your Home Assistant
- Local-first: Works with local-only Home Assistant installations
- Optional crash reports: Anonymous and opt-in only
Troubleshooting Common Issues
Can't Connect to Home Assistant
- Make sure your phone is on the same network as Home Assistant
- Try using the IP address instead of hostname (e.g.,
http://192.168.1.100:8123) - Check that Home Assistant is running and accessible
- For the web app, ensure you have HTTPS set up
Rooms or Devices Not Showing
- Stuga only shows devices that are assigned to areas in Home Assistant
- Go to Settings > Devices & Services > Devices in Home Assistant to assign devices to areas
- Check if you've accidentally hidden rooms or devices in Stuga
Changes Not Saving
- Stuga needs appropriate permissions to modify your Home Assistant configuration
- Make sure you're using an account with admin access
Next Steps
Now that you're up and running with Stuga, here are some things to explore:
- Organize your areas: Take time to properly assign devices to areas in Home Assistant for the best Stuga experience
- Try different themes: Stuga supports light and dark modes, automatically following your device settings
- Provide feedback: Visit our GitHub repository to report issues or suggest features
Stuga is actively developed with regular updates based on community feedback. Check out the changelog to see what's new, or follow the project on GitHub to stay updated.